Puppet in frog crochet
If you want a project that feels playful, creative, and surprisingly satisfying, a Puppet in Frog Crochet is a wonderful idea to explore.
Advertising
It gives you the charm of amigurumi, the fun of a hand puppet, and the freedom to create something that feels full of personality from the very first stitches.
That is exactly why this kind of crochet project can hold your attention so well.
You are not only making a cute object.
You are building a character you can use for storytelling, gifts, nursery decor, educational play, or just pure handmade fun.
A frog puppet can look sweet, funny, realistic, bright, soft, or expressive depending on the yarn, eye placement, and mouth shaping you choose.
In this guide, you will learn how to plan, shape, and personalize a Puppet in Frog Crochet in a way that feels natural, beginner-aware, and enjoyable to finish.
Important: This content is independent, informational, and has no affiliation with, sponsorship from, or control over any store, brand, platform, publisher, or third party mentioned here.
Why a Puppet in Frog Crochet is such a fun project
A Puppet in Frog Crochet is fun because it combines creativity with movement.
Unlike a simple plush toy, a puppet feels interactive right away.
That makes the finished piece more engaging for both the maker and the person using it.
You can shape the face with more intention, exaggerate the eyes, soften the mouth, and create a frog that feels silly, lovable, or even a little theatrical.
This is one of the reasons frog puppets stand out so much in crochet.
They give you room to play.
You can go in a classic green direction, a whimsical bright palette, or even take visual inspiration from real frog colors.
Some makers love the cheerful look of Blue Frogs tones for a fantasy puppet.
Others prefer the bold drama associated with a Red Legged Frog color idea or the striking brightness that people notice in a Golden Dart Frog style palette.
You are not required to make the puppet realistic, but those references can help you think more creatively about color and mood.
What makes a good Puppet in Frog Crochet design
A good Puppet in Frog Crochet design should feel expressive, comfortable to hold, and easy to animate with your hand.
That means the shape matters just as much as the appearance.
You want the puppet to look cute from the outside, but you also want it to function well when someone puts a hand inside.
In most cases, the best designs keep the lower body soft and roomy, while the head and mouth area carry the visual character.
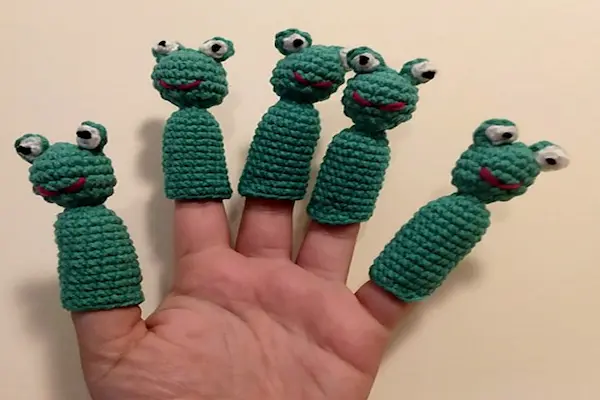
The eyes usually do a lot of the emotional work.
Large rounded eyes placed slightly forward often make the puppet feel friendly and lively.
The mouth opening also matters.
If it is shaped clearly, the puppet becomes much more expressive during play.
That is what transforms a crochet frog from a simple toy into a true puppet.
Best yarn for a Puppet in Frog Crochet
The best yarn for a Puppet in Frog Crochet is one that feels soft, holds shape well enough, and lets you see the stitches clearly while you work.
This is especially important if you want the face details to look neat.
In most cases, smooth acrylic or cotton blends work very well.
They are easy to handle, available in many colors, and practical for projects that may be played with often.
If the puppet is meant for children, easy-care yarn is usually the smartest choice.
You do not want a beautiful handmade puppet that feels stressful to clean.
When choosing yarn, focus on these qualities:
- Softness: the puppet should feel pleasant in the hand.
- Structure: the head and mouth need enough stability to keep their shape.
- Stitch definition: clear stitches make shaping easier and give the finished puppet a cleaner look.
- Durability: puppets are often squeezed, moved, and played with repeatedly.
- Color choice: frog projects become much more expressive when the colors feel intentional.
If you want a more natural frog look, green shades with cream or yellow accents can work beautifully.
If you prefer a fantasy feel, brighter combinations inspired by tropical frog colors can make the puppet more memorable.
Best colors and frog inspirations for your Puppet in Frog Crochet
The color palette you choose can completely change the personality of your Puppet in Frog Crochet.
A soft green puppet with white eyes may feel gentle and classic.
A deeper olive or moss version can feel more woodland-inspired.
A bright blue, red, or golden palette can feel playful and almost storybook-like.
If you enjoy taking inspiration from real frogs, there are many beautiful ideas to consider.
Searches around Phyllobates Terribilis, the Golden Dart Frog, or even colorful tropical species often remind crocheters how dramatic frog color combinations can be.
Likewise, larger frog references such as the American Bull Frog, Bullfrog, Big Frogs, or even curiosity around the Biggest Frog can inspire broader head shapes and chunkier body proportions.
You do not need scientific realism for the puppet to work.
Still, using frog-inspired references can help the final character feel more intentional.
Even a subtle Frog Print mood in the stitching or added spots can make the puppet look more lively and original.
Best stitches for a Puppet in Frog Crochet
The best stitches for a Puppet in Frog Crochet are usually the simple ones used consistently.
You do not need a very advanced pattern to make the puppet adorable and expressive.
Single crochet is often the strongest choice because it creates a dense fabric that holds shape well.
That is especially helpful for the head, mouth, and eye areas.
Half double crochet can also be useful when you want a little more softness in the body of the puppet.
Slip stitches, increases, decreases, and basic shaping techniques will do most of the work.
Good stitch options to consider include:
- Single crochet: ideal for shaping and structure.
- Half double crochet: useful for a softer body section.
- Slip stitch: good for refined edges and mouth shaping.
- Increases and decreases: essential for forming the frog head and body.
- Simple embroidery: perfect for nostrils, smile details, or decorative accents.
If you are new to crochet characters, keeping the stitch pattern simple will usually give you the best experience.
The personality of the puppet comes more from the shaping than from complicated stitchwork.
How to make a Puppet in Frog Crochet step by step
The easiest way to make a Puppet in Frog Crochet is to break the project into clear parts.
That makes the process feel manageable and helps you avoid the overwhelm that can happen when you try to picture the whole puppet at once.
- Start with the main body tube. This creates the space for your hand and gives the puppet its basic structure.
- Shape the head area. Use increases to widen the upper section so the frog looks expressive and balanced.
- Create the mouth. This is one of the most important parts because it gives the puppet life during play.
- Make and attach the eyes. Raised frog eyes usually define the entire character.
- Add arms or simple side details if desired. These are optional, but they can make the puppet even more charming.
- Finish the lower edge neatly. A clean opening makes the puppet more comfortable to use.
- Test the hand fit. Before calling it finished, make sure the puppet feels comfortable and moves well.
This step-by-step structure is often what turns a cute idea into a finished project you genuinely enjoy using.
How to make your Puppet in Frog Crochet look more polished
A polished Puppet in Frog Crochet usually comes from good shaping and clean finishing, not from extreme complexity.
You do not need dozens of details to make it look special.
Instead, focus on the elements that make the character feel alive.
- Keep your tension even. Smooth stitches make the face and body look much cleaner.
- Place the eyes carefully. Small changes in eye position can completely change the puppet’s expression.
- Shape the mouth clearly. A readable mouth line gives the puppet more charm during use.
- Use color with purpose. Contrasting eyes, belly panels, or spots can help define the frog more beautifully.
- Weave in ends securely. A puppet needs to hold up well during repeated play.
If you want the puppet to feel more character-driven, you can also add a tiny bow, scarf, crown, or little stitched cheeks.
Those details work best when they support the frog’s personality rather than overwhelm it.
Creative ideas for styling a Puppet in Frog Crochet
One of the best things about a Puppet in Frog Crochet is how easy it is to personalize.
You can keep it classic or turn it into something much more imaginative.
For example, you might make a bright pond-inspired puppet, a sleepy nursery frog, or a whimsical woodland character.
You can even create a more educational version if the puppet is meant for storytelling around animals and habitats.
Some people enjoy using frog themes as a playful doorway into nature learning.
That can include gentle conversations about Endangered Frogs and why frogs matter in the natural world.
At the same time, it is best to keep the puppet clearly in the handmade play category and not confuse it with technical or scientific material such as Dissecting Frogs references, pet trade searches like Petco Frogs, or feeding terms such as Pacman Food.
A crochet puppet works best as a creative, decorative, and storytelling object.
That clarity keeps the project fun and appropriate.
Is a Puppet in Frog Crochet beginner-friendly?
Yes, a Puppet in Frog Crochet can absolutely be beginner-friendly when you keep the design simple.
The shape is often easier than it looks because you are mostly working with basic tubes, rounds, and facial details.
You do not need advanced lace, complicated garment shaping, or highly technical construction.
That is one reason this project feels so satisfying.
You get a playful and expressive result without needing an overwhelming amount of experience.
If you are newer to crochet, starting from a simple concept similar to a Crochet Frog Free Pattern or a Frog Crochet Free Pattern style can help a lot.
Then you can adapt the same frog personality into a puppet format more confidently.
Final thoughts on making a Puppet in Frog Crochet
A Puppet in Frog Crochet is one of those projects that feels joyful, memorable, and genuinely fun from the first rows to the final eye placement.
It gives you a chance to make something handmade that is not only cute, but also interactive and full of character.
That is a rare combination.
When you choose the right yarn, keep the shaping clear, and let the frog’s face carry the personality, the finished puppet can feel far more special than a simple toy.
You do not need the most complicated pattern to create something charming.
You simply need a clear plan, balanced features, and enough creativity to let the frog come to life in your hands.
And honestly, that is exactly what makes this crochet project so delightful to make.