Granny Stripe Blanket
Advertising
Learn how to crochet a beautiful Granny Stripe Blanket with this complete guide, featuring instructions, tips, and ideas for colors and customization.
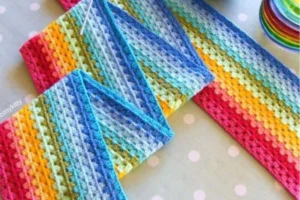
The Granny Stripe Blanket is a beloved classic in the crochet world, cherished for its charm, simplicity, and endless color possibilities.
This timeless design takes the familiar granny stitch and stretches it into rows, creating vibrant horizontal stripes full of personality.
It’s the perfect pattern for beginners and seasoned crocheters alike, offering a rhythmic and relaxing experience.
With just a few basic stitches, you can create a warm and cozy blanket that works up quickly and looks impressive.
The repetitive nature of the granny stripe makes it ideal for mindful stitching or TV-time crochet.
In this guide, you’ll learn everything you need to know to crochet your own Granny Stripe Blanket from start to finish.
We’ll cover materials, pattern basics, sizing, color planning, finishing tips, and creative ideas to make your blanket stand out.
What Is a Granny Stripe Blanket?
A Granny Stripe Blanket uses the classic granny stitch but works it across long rows instead of forming squares.
It consists of clusters of three double crochets spaced evenly along each row.
The result is a fabric with a gentle texture, slight gaps, and a satisfying rhythm of stitches.
Unlike a granny square that grows outward in rounds, this blanket grows from the bottom up in horizontal stripes.
This structure makes it easier to size the blanket and plan color changes row by row.
Granny stripe blankets are often made with leftover yarn or planned color palettes for a rainbow effect.
It’s a pattern that lends itself beautifully to creativity, scrap busting, and cozy comfort.
Why Make a Granny Stripe Blanket?
Granny stripe blankets are incredibly versatile and suitable for all skill levels.
They’re easy to memorize and work on without constantly checking a pattern.
You can use them to practice color changes, gauge tension, or learn how to crochet neatly in rows.
They’re ideal for baby blankets, lapghans, full bedspreads, or even stylish throws for your couch.
Because the pattern is forgiving, it’s a great way to use up stash yarn or experiment with different textures.
The results are both practical and visually stunning, especially when using gradient or bold color schemes.
Granny stripe blankets also make thoughtful gifts that are handmade with love and can last for years.
Materials Needed for a Granny Stripe Blanket
Here’s what you’ll need to get started on your blanket.
1. Yarn
You can use almost any yarn weight, but DK, worsted, or Aran weight yarns work best for a cozy yet manageable project.
Cotton yarn is great for lightweight summer throws, while acrylic and wool provide warmth and stretch.
Choose solid colors, ombré, gradient, or mix and match leftover yarn for a scrap-friendly project.
The amount of yarn depends on the desired size—baby blankets may require 600–800 yards, while a full-size throw could need over 2,000.
2. Crochet Hook
Use the hook size recommended on your yarn label.
Typically, a 4.0 mm to 5.5 mm hook is ideal for DK and worsted weight yarns.
Going up a size can give the blanket a looser drape, while using a smaller hook creates a denser fabric.
3. Scissors
Sharp scissors are essential for cutting yarn neatly between color changes.
4. Yarn Needle
Use a large-eyed needle to weave in ends after each color change and at the end of the project.
5. Stitch Markers (Optional)
Markers can help track your row count or mark key stitches for borders or section changes.
How to Crochet a Granny Stripe Blanket
Let’s walk through a basic version of the pattern.
Step 1: Foundation Chain
Start with a multiple of 3 plus 2 chains for the foundation row.
For example, chain 152 (150 + 2) for a medium lap blanket.
You can increase or decrease the length based on how wide you want the blanket.
The first row will work into this foundation chain.
Step 2: Row 1 – Setup Row
Double crochet into the fourth chain from the hook (this counts as your first cluster).
Skip 2 chains, then work 3 double crochets into the next chain (this forms your first cluster group).
Repeat: skip 2 chains, 3 double crochets into the next chain across the row.
At the end, place 1 double crochet in the final chain.
This row sets up your blanket for the repeating granny stitch pattern.
Step 3: Row 2 and Beyond
Chain 3 and turn your work (this counts as your first double crochet).
Work 3 double crochets in the space between the clusters from the previous row.
Continue placing 3 double crochets between each cluster group all the way across.
End the row with 1 double crochet into the top of the turning chain from the previous row.
Repeat this row for the entire length of the blanket.
Each new row should start and end the same way to maintain a clean edge.
Choosing a Color Palette
One of the joys of making a granny stripe blanket is planning your colors.
You can choose a few favorite shades or go wild with the full rainbow spectrum.
Use color-changing yarn for a magical, blended effect with minimal effort.
Try working in color blocks with 3–4 rows of the same color for a soft, faded look.
If you want something more bold, switch colors every row for a striped, retro vibe.
Neutrals like gray, cream, or navy can ground your palette and create a modern aesthetic.
Keep a notebook or use yarn pegs to plan out your color sequence before starting.
Size Guide for Granny Stripe Blankets
Use this chart to determine your starting chain length and approximate row count.
| Blanket Size | Width (in) | Length (in) | Starting Chains |
|---|---|---|---|
| Baby Blanket | 30 | 35 | ~90 |
| Lapghan | 35 | 40 | ~105 |
| Throw | 50 | 60 | ~150 |
| Twin Bed | 65 | 90 | ~195 |
| Full/Double Bed | 80 | 90 | ~240 |
You can adjust the size by adding or removing clusters in sets of 3.
Measure as you go to ensure the proportions match your plan.
Tips for Perfect Granny Stripes
Follow these practical tips to make your blanket even better.
1. Weave Ends as You Go
Each color change leaves ends to deal with, so weave them in right after switching.
Use a yarn needle to hide them within the cluster rows for a neat finish.
2. Use Consistent Tension
Maintain even stitch tension across rows to keep your blanket flat and uniform.
If your edges start to ripple, check your hook size or loosen your grip.
3. Block the Finished Blanket
Blocking helps even out the rows and makes the blanket drape better.
Steam blocking works well with acrylic yarn, while wet blocking is ideal for cotton or wool.
4. Add a Border
A border frames the blanket and hides any uneven color transitions.
Use single crochet, shell stitch, or a picot edge to add personality.
Granny Stripe Blanket Variations
The basic pattern is a great foundation for creativity.
1. Gradient Fade
Choose a gradient or ombré yarn pack and crochet from light to dark or reverse.
This gives the blanket a modern, flowing color transition.
2. Planned Pooling
Use self-striping yarn and time your color changes to create color pooling effects.
This technique results in beautiful plaid-like or wavy patterns.
3. Scrappy Stripes
Use leftover yarn from previous projects for a colorful, eco-friendly masterpiece.
This is a great way to reduce waste and create a one-of-a-kind blanket.
4. Reversible Stripes
Alternate between front and back post stitches every few rows for texture.
This technique creates a ribbed, thick feel that’s still cozy and warm.
Adding Borders and Finishing Touches
Once you reach your desired length, it’s time to finish strong.
Step 1: Fasten Off
After your final row, cut the yarn and pull through to secure.
Use a yarn needle to weave in the end carefully.
Step 2: Choose a Border Style
Single crochet gives a simple, clean look to your edges.
Shell stitch adds elegance with a bit of flair.
Picot edge creates tiny decorative points for a dainty finish.
Choose a border color that complements your palette or use leftover yarn.
Step 3: Block the Blanket
Lay your finished blanket flat and pin the edges for blocking.
Use steam or wet methods to shape the blanket and relax the fibers.
Let it dry fully before folding or gifting.
Where to Find Patterns and Tutorials
You don’t need a formal pattern to crochet a granny stripe, but free resources help.
-
Attic24 Blog – One of the most popular and beginner-friendly granny stripe tutorials online.
-
Make & Do Crew – Offers modern takes on classic crochet patterns, including stripes and blankets.
-
YouTube Channels – Look for tutorials by Bella Coco, The Crochet Crowd, or Jayda InStitches.
-
Ravelry – Find user-submitted variations of granny stripe patterns for all skill levels.
Use these to explore new techniques or modify the pattern to suit your taste.
The Granny Stripe Blanket is more than just a cozy throw—it’s a blank canvas for creativity and color exploration.
Its simple stitch repeat makes it easy to learn, while the endless design variations keep it exciting.
Whether you’re making a gift, decorating your home, or using up your yarn stash, this pattern is a timeless favorite.
So grab your hook, choose your colors, and start your own Granny Stripe journey today.
You’ll be surprised how relaxing, satisfying, and beautiful each row becomes.