Learn how to make a stylish and warm crochet hat with this detailed beginner-friendly guide using basic stitches and simple techniques.
Anúncios
Crochet hats are among the most practical and rewarding projects you can make with yarn and a hook.
They’re quick, customizable, and ideal for all seasons depending on the stitch, yarn, and style you choose.
Whether you’re creating a cozy winter beanie, a lightweight slouchy hat, or a playful accessory for kids, the possibilities are endless.
Crocheting your own hat also gives you full control over color, fit, and texture.
In this complete guide, you’ll learn how to crochet a hat from start to finish using beginner-friendly methods.
We’ll explore materials, basic stitches, shaping techniques, and tips to help you make the perfect hat every time.
Let’s get started with everything you need before picking up your hook.
Materials Needed for a Crochet Hat
To begin your crochet hat project, you’ll need a few essential materials.
1. Yarn
Worsted weight yarn (Category 4) is the most common choice for hats.
You can also use bulky yarn (Category 5) for extra warmth or lightweight yarn (Category 3) for breathable styles.
Acrylic yarn is great for affordability and durability, while wool adds warmth and elasticity.
Cotton is best for summer hats or sensitive skin.
You’ll need approximately 100–150 yards for an adult-sized hat.
2. Crochet Hook
Most hat patterns use a 5.0 mm (H-8) or 5.5 mm (I-9) hook for worsted yarn.
Check your yarn label for a recommended hook size and adjust based on your tension.
Using a smaller hook makes tighter stitches and a firmer fabric.
A larger hook will give you looser stitches and more stretch.
3. Scissors
Sharp scissors are needed to cut your yarn cleanly.
Keep them nearby as you finish and trim ends.
4. Yarn Needle
Use a tapestry needle to weave in ends and close the crown of the hat.
Look for one with a large eye to fit your yarn comfortably.
5. Stitch Markers
Helpful for keeping track of rounds or shaping points in your hat.
They’re especially useful in projects worked in continuous rounds.
Crochet Stitches Commonly Used in Hats
Crochet hats typically use a combination of these basic stitches.
1. Chain Stitch (ch)
Used to begin projects and create spaces between stitches.
It’s the foundation of nearly every crochet item.
2. Slip Stitch (sl st)
Used for joining rounds or moving your stitch placement.
It’s also great for a clean edge or shaping.
3. Single Crochet (sc)
A tight and dense stitch that provides warmth and structure.
Ideal for hats in cold weather or ribbed brims.
4. Half Double Crochet (hdc)
Creates a slightly taller and more flexible stitch than sc.
Common in slouchy hats and textured designs.
5. Double Crochet (dc)
Used for looser and more open hats or decorative patterns.
It works up quickly and creates a nice drape.
How to Crochet a Hat: Step by Step
There are several ways to crochet a hat, but this simple top-down method is one of the easiest to master.
Step 1: Create a Magic Ring
Begin by forming a magic ring or chain 4 and join into a loop.
The magic ring allows you to pull the center tight, leaving no hole at the top.
Chain 2 (does not count as a stitch).
Work 10 half double crochet (hdc) into the ring.
Join with a slip stitch to the first hdc.
Step 2: Increase the Crown
Work increase rounds to expand the crown of the hat.
- Chain 2, work 2 hdc in each stitch around (20 stitches).
- 1 hdc, 2 hdc in next stitch, repeat around (30 stitches).
- 2 hdc, 2 hdc in next stitch, repeat around (40 stitches).
- 3 hdc, 2 hdc in next stitch, repeat around (50 stitches).
Continue increasing until the circle measures about 6.5 inches across for an adult-sized hat.
Step 3: Work Even Rounds
Now crochet even rounds without increasing to build the height of the hat.
Continue with 1 hdc in each stitch around.
Work about 12–15 rounds depending on how tall you want the hat.
Try on the hat as you go to adjust length for a snug or slouchy fit.
Use stitch markers to keep track of your beginning stitch if working in a spiral.
Step 4: Shape and Finish
Once your hat reaches the desired length, fasten off the yarn and weave in the end with your tapestry needle.
To create a brim, you can add ribbing using front and back post double crochets (fpdc and bpdc).
Alternatively, crochet 3–4 rows of single crochet for a simple border.
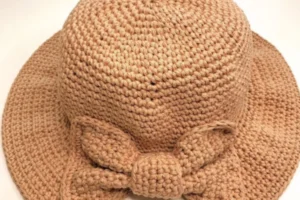
Add a decorative touch by sewing on a faux fur pom-pom or crocheting your own.
Size Chart for Crochet Hats
Here’s a basic sizing guide to help you choose the right measurements.
| Size | Crown Diameter | Hat Height | Head Circumference |
|---|---|---|---|
| Baby (0–3m) | 4 in (10 cm) | 5 in (13 cm) | 13–14 in (33–36 cm) |
| Toddler | 5 in (12.5 cm) | 6 in (15 cm) | 16–18 in (41–46 cm) |
| Child | 5.5 in (14 cm) | 6.5 in (17 cm) | 18–20 in (46–51 cm) |
| Teen/Adult | 6.5 in (16.5 cm) | 7–8 in (18–20 cm) | 21–23 in (53–58 cm) |
Adjust your increase rounds and total rounds based on the recipient’s size.
Customizing Your Crochet Hat
You can easily adapt this basic pattern to create unique hat styles.
1. Add Stripes
Change yarn color every few rows for a striped effect.
Use contrasting or gradient colors for variety.
Carry yarn up the inside or cut and weave in ends.
2. Try Different Stitches
Use a puff stitch or shell stitch to add texture.
Mix hdc and dc for ribbing or visual interest.
Explore post stitches or popcorn stitches for chunkier designs.
3. Make a Slouchy Hat
Add more height before finishing the crown for a relaxed fit.
Use softer yarn and a slightly larger hook for more drape.
Decrease slightly before closing to keep the slouchy shape.
4. Add Earflaps or Braids
Crochet two triangular earflaps and attach them to each side.
Add braided ties or tassels for a fun and practical winter hat.
Great for children’s hats or cold climates.
Tips for Success
Follow these helpful tips to make sure your hat turns out beautifully.
1. Measure Your Gauge
Crochet a small swatch and measure your stitches per inch.
This ensures your hat will fit as expected.
Adjust your hook size if your gauge is off.
2. Use Stitch Markers
Mark your starting stitch when working in rounds.
This prevents mistakes and helps keep track of rows.
3. Try On as You Go
If possible, try the hat on or measure it against the recipient’s head.
This lets you adjust for comfort and style.
4. Use Good Lighting
Working with dark yarn can be difficult.
Bright lighting helps you see stitches clearly.
Best Yarn Types for Crochet Hats
Not all yarn is created equal when it comes to hats.
-
Acrylic: Affordable, washable, and widely available.
-
Wool: Warm, stretchy, and ideal for winter.
-
Cotton: Lightweight, breathable, and great for summer.
-
Blends: Combine benefits of multiple fibers like acrylic and wool.
Always choose yarn that feels comfortable against the skin.
Soft yarns with a bit of elasticity work best for beanies and snug fits.
Where to Find Crochet Hat Patterns
There are many great places to find free and paid crochet hat patterns.
-
Ravelry – Filter by style, yarn weight, skill level, and more.
-
Etsy – Support small designers with downloadable PDFs.
-
Pinterest – Search by style and link to blogs or videos.
-
YouTube – Watch tutorials for visual learners.
-
Craft Blogs – Follow creators like Repeat Crafter Me and All About Ami.
Choose patterns with good reviews, clear instructions, and sizing options.
Crocheting a hat is a fantastic way to practice new stitches and make something useful and stylish.
With just a hook, some yarn, and a little time, you can create a cozy accessory for yourself or a loved one.
Whether it’s a beanie, slouchy hat, or a textured design, the options are endless and always fun to explore.
Remember to start with the basics, measure as you go, and don’t be afraid to customize your hat with color, texture, or accessories.
Once you complete your first hat, you’ll be inspired to make many more for every season and occasion.
So grab your yarn, pick a pattern, and start crocheting the perfect hat today.