Learn how to crochet adorable amigurumi toys with this complete step-by-step tutorial for beginners and advanced crafters alike.
Anúncios
Amigurumi is the Japanese art of crocheting small, stuffed yarn creatures that are cute, charming, and full of personality.
From animals and dolls to fantasy characters and food, amigurumi offers endless possibilities for creativity.
It’s a perfect crochet technique for beginners because it uses only a few basic stitches.
But it also allows experienced crafters to explore more advanced shaping, detailing, and expression.
Whether you’re making gifts, toys, or decorative collectibles, amigurumi adds a joyful touch to your handmade creations.
In this tutorial, you’ll learn everything you need to start your amigurumi journey—from tools and materials to step-by-step construction and finishing.
Let’s dive into the adorable world of amigurumi and bring your imagination to life, one stitch at a time.
What is Amigurumi?
Amigurumi is a Japanese word that combines “ami” (crocheted or knitted) and “nuigurumi” (stuffed doll).
The style is known for its cute and rounded look, often featuring large heads, tiny limbs, and embroidered features.
Amigurumi is typically crocheted in spirals using single crochet stitches and worked in the round.
Unlike traditional crochet, which often creates flat fabric, amigurumi focuses on building 3D forms.
Each part—such as the head, body, arms, and legs—is made separately and then sewn together.
It’s a highly customizable craft, allowing you to invent your own characters and expressions.
Materials Needed for Amigurumi
Before you begin, gather these essential tools and supplies to ensure success.
1. Yarn
Choose a smooth, non-fuzzy yarn to make stitches easier to see.
Cotton yarn is a favorite for amigurumi because it’s sturdy and holds shape well.
Acrylic yarn is softer and more affordable but can stretch slightly.
Stick to worsted-weight or DK yarn for beginner-friendly sizes.
You’ll also want contrasting colors for facial features, accessories, and detail work.
2. Crochet Hook
Use a smaller hook than recommended for your yarn to create a tight fabric.
This prevents stuffing from poking through the stitches.
For worsted-weight yarn, a 3.5 mm or 4.0 mm hook works well.
3. Polyester Stuffing (Fiberfill)
Amigurumi toys are filled with soft stuffing to give them volume and shape.
Use polyester fiberfill, which is washable, lightweight, and hypoallergenic.
Stuff firmly but not so tightly that the fabric stretches.
4. Stitch Marker
Because amigurumi is crocheted in continuous rounds, stitch markers help you track the beginning of each round.
Move the marker up as you complete each round.
5. Yarn Needle (Tapestry Needle)
Used to sew parts together and weave in ends.
Choose one with a large eye that fits your yarn and a blunt tip for easy use.
6. Scissors
Sharp scissors are needed for cutting yarn and trimming excess ends.
7. Safety Eyes or Embroidery Thread
Use plastic safety eyes (usually 6–12 mm) for a clean finish.
Alternatively, you can embroider eyes with thread or yarn for a baby-safe version.
Choose the style that fits your character’s personality.
Basic Crochet Stitches Used in Amigurumi
Amigurumi only requires a few fundamental crochet techniques.
1. Magic Ring
Used to begin crocheting in the round without a hole in the center.
Essential for starting heads, bodies, and limbs.
2. Single Crochet (sc)
The most important stitch in amigurumi.
Creates a tight, uniform surface ideal for shaping.
3. Increase (inc)
Two single crochet stitches worked into the same stitch.
Used to grow your shape by expanding each round.
4. Decrease (dec)
Crochet two stitches together to reduce the total count.
Used to taper and shape your amigurumi piece.
5. Slip Stitch (sl st)
Used to join or finish parts cleanly.
Sometimes used for details or surface decoration.
Step-by-Step: How to Make a Basic Amigurumi Tutorial Ball
This simple sphere is the foundation for most amigurumi heads and bodies.
- Magic ring, 6 sc into the ring (6)
- Inc in each stitch (12)
- 1 sc, inc around (18)
- 2 sc, inc around (24)
- 3 sc, inc around (30)
- Sc around (30)
- 3 sc, dec around (24)
- 2 sc, dec around (18)
- 1 sc, dec around (12)
Start stuffing the ball with fiberfill.
Round 14: Dec around (6)
Fasten off and weave in the tail to close.
You’ve now completed a basic amigurumi shape.
This technique can be applied to create heads, bodies, and accessories.
How to Attach Amigurumi Pieces Together
Most amigurumi figures are made of separate pieces.
Once you finish each part, use a yarn needle to sew them securely.
-
Pin pieces in place before sewing to check alignment.
-
Use whip stitch or mattress stitch for smooth joins.
-
Work with the same yarn used in the piece for invisible seams.
-
Add stuffing to arms or legs before attaching.
-
Shape and adjust parts with your hands after sewing.
Proper attachment is key to getting balanced and symmetrical results.
Embroidering Eyes, Mouth, and Details
Details bring your amigurumi characters to life.
Use black yarn or embroidery thread to add smiles, eyebrows, noses, or even freckles.
You can stitch the eyes in an arc for a sleepy look or wide open for excitement.
Use French knots or satin stitch for texture and shading.
Avoid placing eyes too far apart, as this changes the expression.
A standard spacing is 6 to 8 stitches apart on the same row.
Use blush or pink yarn for cheeks, or lightly apply fabric-safe blush for color.
Creating Arms, Legs, and Ears
Small body parts are made using the same increase and decrease techniques.
Example: Arm
Round 1: Magic ring, 6 sc (6)
Rounds 2–6: Sc around (6)
Fasten off, stuff lightly, and sew to the side of the body.
Make sure limbs are aligned evenly and proportionate to the body.
Ears can be sewn flat or puffed for 3D style.
Making Hair, Clothes, and Accessories – Amigurumi Tutorial
To take your amigurumi to the next level, try adding hair and outfits.
-
Hair: Use loop stitch or attach yarn strands to the head.
-
Hats: Crochet a small circle and adjust increases for a snug fit.
-
Scarves: Chain a long strip and sc back for a cozy touch.
-
Overalls or Dresses: Shape rectangles and sew into place with extra straps or buttons.
Accessories personalize your creation and make it truly special.
Safety Tips for Amigurumi Toys
If your amigurumi will be used by small children, keep these safety tips in mind.
-
Avoid buttons, beads, or glued parts.
-
Use embroidered eyes instead of safety eyes for babies.
-
Secure all seams tightly to prevent parts from detaching.
-
Wash your project before giving it as a gift.
Handmade toys are treasures, but they should always be safe and durable.
Common Mistakes and How to Avoid Them
Even experienced crocheters make mistakes—here’s how to fix or prevent them.
-
Stuffing too much or too little: Adjust gradually and shape as you go.
-
Uneven stitches: Practice tension control and keep your hand relaxed.
-
Lopsided shapes: Count stitches every round and mark your start.
-
Parts not aligned: Pin everything first before sewing.
Mistakes are part of the learning process, so don’t be afraid to unravel and retry.
Where to Find Free and Paid Amigurumi Patterns
Many designers share amigurumi patterns online for all skill levels.
-
Ravelry – A massive library of free and paid patterns with user reviews.
-
Etsy – Digital downloads from independent designers with unique styles.
-
YouTube – Step-by-step video tutorials from channels like HappyBerry, Amigurumi Today, and Wooly Wonders.
-
Pinterest – Visual inspiration that links to blogs and pattern shops.
-
Instagram – Follow hashtags like #amigurumi or #amigurumipattern.
Always read reviews and check pattern difficulty before starting.
Tips – Amigurumi Tutorial
Once you’ve mastered your craft, consider selling your handmade amigurumi.
-
Take clear, well-lit photos.
-
Use tags and labels with fiber content and care instructions.
-
Choose designs that appeal to your audience.
-
Price fairly by including time, materials, and uniqueness.
-
Offer custom options like name tags or color choices.
Etsy, craft fairs, and social media are great platforms to build your audience.
Amigurumi is a delightful and creative form of crochet that allows you to craft adorable characters with just a hook and some yarn.
It’s beginner-friendly yet endlessly customizable, making it perfect for both new and experienced crocheters.
With the right tools, a little patience, and this step-by-step tutorial, you can start making your own amigurumi toys today.
Practice the basics, explore new patterns, and most importantly—have fun with your stitches.
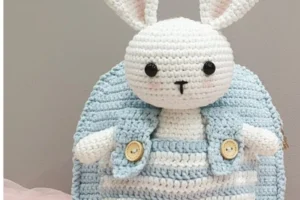
From tiny bunnies to big bears, the only limit is your imagination.
Now grab your yarn and hook, and start bringing your favorite characters to life.
Your next crochet friend is just a few stitches away.