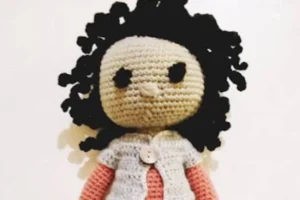
Amigurumi crochet doll
Learn how to make your own amigurumi crochet doll with this complete step-by-step tutorial perfect for beginners and experienced crafters.
Advertising
Amigurumi crochet dolls are charming, customizable, and full of personality.
They make wonderful gifts, collectibles, or decorations for children and adults alike.
The word “amigurumi” originates from Japan and refers to crocheted or knitted stuffed dolls.
Whether you want to create a classic toy or design your own character, the amigurumi crochet doll is a perfect project.
In this tutorial, you will learn the full process of creating a crochet doll from head to toe.
This includes materials, stitches, shaping, sewing, detailing, and finishing techniques.
It’s designed for all levels, with clear instructions and options for customization.
Let’s start bringing your crochet doll to life.
Materials Needed to Crochet an Amigurumi Doll
Before you start, gather all the supplies for a smooth crochet experience.
1. Yarn
Use cotton or acrylic yarn with a smooth texture to show stitch definition.
Choose skin-tone colors for the body and fun colors for clothing and accessories.
DK or worsted weight yarn (Category 3 or 4) is ideal.
You will need approximately 200–300 yards in total for a small to medium-sized doll.
2. Crochet Hook
Use a hook smaller than the yarn label suggests to create tight stitches.
A 2.5 mm to 3.5 mm hook works well for most amigurumi dolls.
Tighter stitches prevent stuffing from poking through.
3. Stuffing
Polyester fiberfill is soft, washable, and easy to work with.
Stuff the doll firmly but evenly to avoid lumps.
4. Yarn Needle
Used for sewing pieces together and weaving in ends.
Choose a blunt-tip needle with a large eye.
5. Stitch Markers
Mark the beginning of rounds, especially when working in spirals.
This helps keep track of your stitch count and position.
6. Safety Eyes or Embroidery Thread
Use plastic safety eyes for a polished look, or embroider eyes for baby-safe dolls.
Choose the size based on the head and desired expression.
7. Scissors
Sharp scissors are essential for cutting yarn cleanly and trimming loose ends.
Basic Crochet Stitches Used in Amigurumi
This crochet doll pattern uses only a few basic stitches.
1. Magic Ring (MR)
Start most parts with a magic ring for a tight center.
Allows you to pull the opening completely closed.
2. Single Crochet (sc)
The most common stitch in amigurumi.
Creates a dense, smooth fabric perfect for stuffed toys.
3. Increase (inc)
Two single crochets in one stitch to widen the round.
Used to form shapes like heads and bodies.
4. Decrease (dec)
Single crochet two stitches together to narrow the shape.
Used to taper and close parts.
5. Slip Stitch (sl st)
Used to join or finish edges cleanly.
Step-by-Step Guide to Making a Crochet Doll
The doll is made in sections and then assembled.
Step 1: Crochet the Head
The head is typically a round ball and forms the base of the face.
Round 1: Magic ring, 6 sc (6)
Round 2: Inc in each stitch around (12)
Round 3: 1 sc, inc around (18)
Round 4: 2 sc, inc around (24)
Continue increasing until you reach 48 stitches (approx. 7–8 rounds).
Rounds 9–16: Sc around (48)
Start decreasing:
Round 17: 6 sc, dec around (42)
Round 18: 5 sc, dec around (36)
Continue decreasing every round.
Before the opening gets too small, insert the safety eyes.
Stuff the head firmly and finish decreasing until the hole closes.
Fasten off and weave in.
Step 2: Crochet the Body
The body is usually a tapered tube starting wide and narrowing at the waist.
Round 1: Magic ring, 6 sc (6)
Round 2: Inc in each stitch (12)
Round 3: 1 sc, inc around (18)
Continue increasing until you reach 36–42 stitches.
Work even rounds until desired torso height.
Start decreasing to shape the waist.
Stuff as you go to maintain firmness.
End the body with a flat top and fasten off, leaving a long tail.
Sew it securely to the head.
Step 3: Make the Arms
Arms are small tubes attached to the sides of the body.
Round 1: Magic ring, 6 sc
Round 2–12: Sc around (6)
Stuff lightly and flatten the top.
Make 2 arms.
Sew to the upper sides of the body.
Position them symmetrically and angle slightly forward.
Step 4: Crochet the Legs
Legs can be short and stubby or long and skinny, depending on style.
Round 1: Magic ring, 6 sc
Round 2: Inc in each stitch (12)
Round 3: 1 sc, inc around (18)
Work even for 2–3 rows, then narrow to 12 sc.
Continue until the desired leg length.
Stuff and sew to the bottom of the torso.
Ensure the doll can sit or stand, depending on preference.
Step 5: Add Facial Features
Face details give your doll its personality and charm.
Use embroidery floss or yarn for the mouth and eyebrows.
Stitch a simple smile or a more expressive shape.
Use blush or pink thread for cheeks.
Add eyelashes or eyebrows for character.
Safety eyes should be evenly placed with a gap of 6–8 stitches between.
Step 6: Crochet Hair
Hair can be embroidered, crocheted in loops, or attached in strands.
For strands, cut multiple yarn lengths and attach with lark’s head knots.
For a wig cap, crochet a circle to fit the head and attach strands to it.
Style into braids, buns, or ponytails.
Secure tightly and shape with fingers.
Use small bows or accessories to decorate.
Step 7: Make Clothes and Accessories
Clothing turns a simple doll into a fully realized character.
Crochet a basic dress by chaining a foundation and working rows.
Make skirts, pants, or sweaters depending on the theme.
Add buttons, ribbons, or embroidery to decorate outfits.
Create removable clothes for more play options.
Use color changes in the body to simulate built-in clothes if desired.
Tips for a Polished Amigurumi Doll
Follow these tips for a professional-looking finish.
-
Stuff evenly to avoid lumps and keep symmetry.
-
Use invisible decreases to hide shaping lines.
-
Sew parts carefully with strong yarn and backstitch for durability.
-
Block lightly with steam to smooth shapes if needed.
-
Emphasize details like fingers, toes, or dimples with light shaping.
Creative Variations for Your Crochet Doll
Let your imagination run wild by changing your doll’s theme or personality.
-
Fantasy: Add wings, crowns, or magical accessories.
-
Occupational: Make a nurse, chef, or astronaut outfit.
-
Animals: Add ears and tails for a hybrid character.
-
Seasonal: Dress the doll in winter, summer, or holiday styles.
-
Miniature: Use thread and a tiny hook for a pocket-sized version.
Amigurumi dolls are the perfect canvas for storytelling.
Where to Find Amigurumi Crochet Doll Patterns
Explore patterns and inspiration from these trusted sources.
-
Ravelry: Massive database of free and paid doll patterns.
-
Etsy: Purchase unique PDF patterns from indie designers.
-
Pinterest: Visual inspiration linking to blogs and tutorials.
-
YouTube: Watch step-by-step video tutorials on doll making.
-
Instagram: Follow tags like #amigurumidoll or #crochetdoll.
Always choose patterns that match your skill level and yarn.
Safety Guidelines for Amigurumi Dolls
Keep the recipient in mind when designing and building your doll.
-
For babies: Avoid safety eyes and buttons—use embroidery instead.
-
Double stitch seams for extra durability in play dolls.
-
Use non-toxic, washable yarn that’s safe for skin.
-
Trim all ends and check for secure joins.
Dolls should be huggable, lovable, and safe.
How to Care for a Crochet Doll
Handmade dolls are long-lasting when properly cared for.
-
Hand wash in cold water with mild soap.
-
Air dry flat and reshape while drying.
-
Do not bleach or use hot water.
-
Avoid machine washing unless the doll is made entirely of machine-safe materials.
Spot cleaning is often enough for minor stains.
Making an amigurumi crochet doll is one of the most enjoyable and fulfilling crochet projects you can try.
It combines technical skill, creativity, and love in every stitch.
From shaping the head to adding the final touches of personality, each step is part of a meaningful process.
You now have the tools and knowledge to bring a completely original character to life.
Whether it’s a sweet gift, a custom order, or a treasured keepsake, your handmade crochet doll will bring joy wherever it goes.
So grab your yarn, pick your favorite colors, and begin creating your own adorable amigurumi crochet doll today.