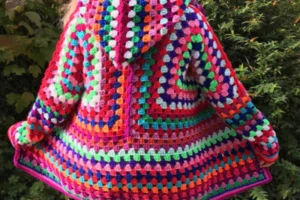
Gylly Beach Jacket
Advertising
Create your own stylish Gylly Beach Jacket with this beginner-friendly crochet guide, featuring tips, techniques, and free pattern ideas.
The Gylly Beach Jacket is a lightweight and stylish crochet cardigan perfect for summer days and breezy evenings.
Inspired by the laid-back charm of coastal living, this jacket combines comfort, simplicity, and effortless elegance.
Its relaxed fit and airy construction make it the ideal project for layering over swimsuits, tank tops, or summer dresses.
Designed with beginner and intermediate crocheters in mind, the Gylly Beach Jacket uses basic stitches to build a beautiful garment.
This tutorial will walk you through everything you need to know—from choosing the right yarn to customizing your own beach-ready jacket.
By the end of this guide, you’ll feel confident to start crocheting your very own Gylly Beach Jacket and show it off all season long.
What Is the Gylly Beach Jacket?
The Gylly Beach Jacket is a casual, open-front crochet cardigan with a breezy, relaxed silhouette.
It’s named after Gyllyngvase Beach, a popular spot in Cornwall, England known for its calm waters and serene views.
Like the beach it’s named after, this jacket is all about lightness, flow, and simplicity.
Typically, it features a boxy shape, minimal shaping, and wide sleeves for a comfy, laid-back look.
It’s made in panels or as a rectangle with sleeves added—no complicated shaping or tailoring involved.
This makes it a perfect project for newer crocheters looking to try wearable crochet for the first time.
You can dress it up or down, and it pairs beautifully with summer outfits for day or night.
Materials Needed
Before you begin crocheting your Gylly Beach Jacket, gather the following materials:
1. Yarn
Choose a lightweight yarn like DK (Category 3) or sport weight (Category 2) for a breathable feel.
Cotton, bamboo, or cotton-blend yarns are ideal for summer wear and provide great stitch definition.
Neutral tones like white, beige, or light gray are popular for a beachy aesthetic.
Bright colors or variegated yarns also work well for a bold, playful version.
Depending on the size, you’ll need approximately 800–1,200 yards of yarn.
2. Crochet Hook
A 4.0 mm (G/6) to 5.0 mm (H/8) hook is typically used for this type of project.
Make sure to check your yarn label and adjust your hook to match the recommended gauge.
Larger hooks will create more drape, while smaller hooks result in a denser fabric.
3. Tapestry Needle
A blunt-tip tapestry needle is essential for weaving in ends and seaming panels together.
Choose a metal or plastic needle with a large eye that accommodates your yarn.
4. Stitch Markers
Use stitch markers to keep track of key points like sleeve openings or row counts.
They help ensure accuracy, especially when joining parts or counting repeats.
5. Measuring Tape
Measure your width and length as you go to ensure a good fit.
Check sleeve length and shoulder width before seaming.
Basic Construction of the Jacket
The Gylly Beach Jacket follows a simple construction method that’s easy to modify for your own style.
1. Rectangle Body
The body is usually created from one or two rectangles—one for the back and one split for the front panels.
Each rectangle is made by working rows of basic stitches like double crochet or extended single crochet.
You can adjust the length by adding more rows or make the jacket shorter for a cropped look.
Leave space for the neck opening when creating the front panels, usually by stopping halfway.
2. Sleeves
The sleeves can be crocheted directly onto the body or made separately and sewn on later.
They are often wide and flowy, sometimes with tapered ends or ribbed cuffs for style.
Crocheting the sleeves in the round helps avoid seams and keeps the jacket lightweight.
3. Seaming and Finishing
Seam the sides and shoulders using slip stitch or mattress stitch for a clean finish.
Add a border around the body opening and sleeve cuffs using single crochet or shell stitch.
This gives the jacket structure and adds a touch of style.
Blocking your finished pieces will improve drape and shape, especially with cotton yarn.
Stitches Used in the Gylly Beach Jacket
The jacket uses simple crochet stitches, which makes it easy and relaxing to work on.
1. Double Crochet (dc)
Double crochet creates height and openness in the fabric.
It’s perfect for garments meant to be breezy and lightweight.
To make a double crochet: yarn over, insert hook, yarn over, pull through, yarn over, pull through two loops twice.
2. Chain Stitch (ch)
Used between stitches for spacing and structure.
Chains are also used in turning rows and shaping sleeves or panels.
3. Single Crochet (sc)
Used for borders and finishing edges, adding durability and clean lines.
To make a single crochet: insert hook, yarn over, pull through, yarn over, pull through both loops.
4. Slip Stitch (sl st)
Used in joining seams or rounds and for subtle shaping.
Slip stitches create no height but add security and neatness to seams.
Size Adjustments and Custom Fit
The Gylly Beach Jacket is a forgiving design that suits all body shapes.
You can easily adjust the width by adding or subtracting stitches in the foundation chain.
To lengthen the jacket, simply add more rows until it reaches your desired length.
Make sure to measure shoulder width and sleeve length to ensure a good fit.
Try on the panels as you go to check proportions and overall feel.
For larger sizes, consider adding an extra panel or widening the front pieces.
Styling and Color Ideas
This jacket is incredibly versatile and works well with many different colors and textures.
Go for soft neutrals like cream, taupe, or light blue for a coastal, beachy vibe.
Choose bold tones like coral, turquoise, or mustard for a summer statement piece.
Consider color blocking the sleeves or creating stripes to add dimension.
Use hand-dyed yarns or gradient yarn cakes for a flowing, artistic look.
Pair your Gylly Beach Jacket with denim shorts, dresses, or swimsuits for the perfect summer outfit.
It also works great as a lightweight cover-up for travel or chilly indoor environments.
Free Gylly Beach Jacket Pattern Example
Here’s a basic pattern recipe to create a simple Gylly Beach Jacket from rectangles.
Back Panel
Chain 60 (or desired width).
Work double crochet rows until it reaches your desired length (about 60–70 rows).
Fasten off and weave in ends.
Front Panels (Make 2)
Chain 30.
Work the same number of rows as the back panel.
Fasten off both panels.
Sleeves (Optional)
Chain 40.
Join to form a ring.
Work in double crochet rounds until sleeves are 15–18 inches long.
Add ribbing or edging if desired.
Assembly
Lay the back panel flat.
Attach the front panels to each side of the back.
Seam shoulders and sides.
Attach sleeves to armholes and secure with slip stitch or mattress stitch.
Add a border around the jacket using single crochet or your favorite edge stitch.
Block and wear with pride.
Tips for a Beautiful Finish
Weave in all ends as you go to save time during assembly.
Use the same yarn for seaming to maintain a uniform appearance.
Block pieces before sewing to ensure symmetry and drape.
Experiment with borders like crab stitch, picot, or shell edge for flair.
If using cotton yarn, gently steam block for a polished finish.
Take time to match sleeve seams and neckline edges for a professional look.
Helpful Tutorials and Resources
-
YouTube – Search for “crochet kimono cardigan” or “summer beach jacket crochet tutorial.”
-
Ravelry – Find similar open-front cardigan patterns and customize your version.
-
Pinterest – Browse styling ideas and color combinations for inspiration.
-
Make & Do Crew Blog – Offers beginner-friendly wearables with step-by-step visuals.
-
YarnSub.com – Helps find yarn alternatives if your first choice isn’t available.
The Gylly Beach Jacket is the perfect lightweight crochet project for sunny days and cool nights.
Its simple construction and relaxed fit make it accessible for beginners and satisfying for experienced crocheters.
With the right yarn and a little creativity, you can personalize this piece to match your style and wardrobe.
Whether you’re making it for the beach, vacation, or casual everyday wear, it’s a stylish and practical addition.
So grab your favorite yarn, follow the steps, and enjoy crafting your own Gylly Beach Jacket.
It’s a piece you’ll be proud to wear and show off every summer.